Ozone Applications

Build Your Own Chamber
Ozone Chambers
There are many different options for ozone chambers. Many chambers will have an integrated turnkey system where ozone will be produced from the chamber itself. However, if you are looking for a more cost-effective option, or, you already have a chamber, room, or enclosure you want to control ozone levels inside of, building your own ozone chamber is a great alternative. This article will go over the different products necessary for assembling an ozone chamber, as well as some different specifications to take note of to make sure you get the products that will best fit your applications.
Components
Ozone Generator - The most important component is the ozone generator to produce ozone for your ozone chamber!
Choose the ozone generator size and output, normally rated in g/hr (grams per hour), based upon the following factors
- Size of your ozone chamber - larger chamber = more ozone demand
- Level of ozone required inside your chamber, normally measured in ppm. Higher ozone levels desired will require larger ozone generators
- Temperature of the chamber - higher temperatures will increase the ozone half-life and demand more ozone
- Organic loading in the chamber - material in the chamber that will consume ozone due to natural organic loading should be considered
Our suggested ozone generators to consider:
HTU-500: Double quartz dielectric allows the HTU-500 to produce extremely pure ozone at 1 g/hr from only 0.75 LPM oxygen.
VMUS-4: Air-cooled, with electronic adjustability, can produce 10 g/hr at 4 LPM oxygen, or 4 g/hr from dry air.
VMUS-10: Air-cooled, wall-mount generator capable of producing 20 g/hr at 8 LPM oxygen, or 10 g/hr from dry air.
OXG-10: Turnkey generator that produces 10 g/hr of ozone.
OXG-20: Turnkey generator capable of making 20 g/hr of ozone.
OXG-30: Turnkey generator that makes ozone at 30 g/hr.
OXG-40: Turnkey generator capable of producing 40 g/hr of ozone.
See all of our ozone generators HERE
Ozone Monitor - An ozone monitor is required to measure ozone in the chamber and switch a relay in the ozone monitor to control the ozone levels. The ozone monitor will be located outside of the chamber with either a remote sensor, or small Teflon tubing inlet port placed inside the chamber to detect ozone levels.
Two main options are available to measure ozone
- UV based ozone analyzer - pulls a sample of ozone gas from the chamber, passes through a UV lamp and measures ozone by determining how much ozone is absorbed by the UV lamp. This method allows for ozone detection accuracy up to 1%, and measurements from 0.001 ppm up to 10,000 ppm and even higher.
- Remote mount sensor based ozone monitor - an ozone sensor is placed inside the chamber and wired to the main ozone monitor placed outside the chamber. This method allows for ozone detection accuracy ranging from 5 - 20% and measurement from 0.01 ppm up to 200 ppm reliably. These sensors are a lower price point than the UV analyzer and are normally used when cost is a concern.
The ozone measurement device must have a built-in relay that can be wired to the RCB-1 relay box that will turn the ozone generator ON/OFF. This relay should be easy to set and alter if necessary.
Our suggested ozone monitors to consider:
A14/A11: 0-2 ppm
OS-6: 0-20 ppm or 0-50 ppm
F-12: 0-2 ppm or 0-20 ppm or 0-2000 ppm
See all of our ozone monitors HERE
Our Suggested UV-based ozone analyzers to consider:
UV-106-L: 0-100 ppm -Resolution of 0.0001 ppm
UV-106-M: 0-1,000 ppm -Resolution of 0.01 ppm
UV-106MH: 0-10,000 ppm -Resolution of 0.01 ppm (Can also read ozone % by volume: up to 1% by volume)
See all of our UV-based ozone analyzers HERE
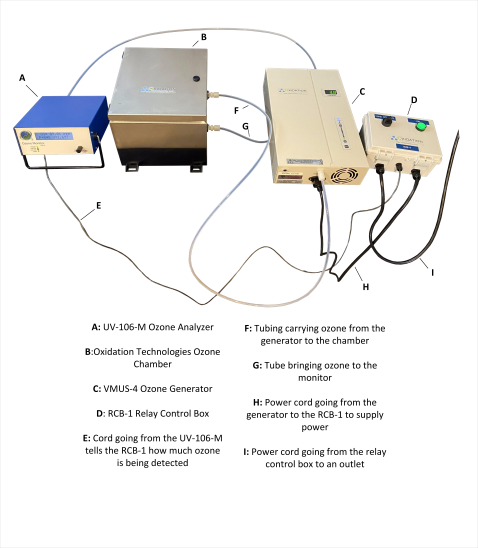
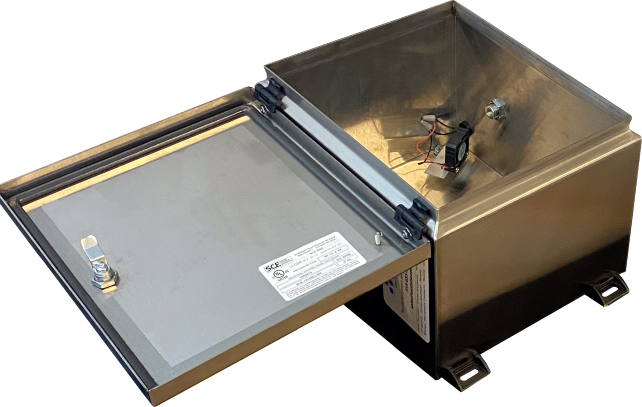
Relay Control - The relay control box has three components to it necessary for creating the ozone chamber. By looking at the image above, we can see the three different cords coming from the bottom of it (smaller white box on the far right side of the above image). Its far-left cord is simply connected to a wall outlet to supply power. The thinner, middle cord connects to the ozone monitor (far left, white/blue item) and then its far-right cord connects to the ozone generators power cord, and supplies power to the ozone generator. When it comes to which relay control box to use, Oxidation Technologies offers the RCB-1.
Ambient Ozone Sensor - We also highly recommend using either the C-30ZX Ozone Monitor, or the SM-70 Ozone Monitor to read for ozone in the air. This ensures that your environment is safe and free of ozone. Both of these monitors offer accurate ozone readings, compact designs, and low maintenance making them easy to use as well as extremely efficient.
How It Works
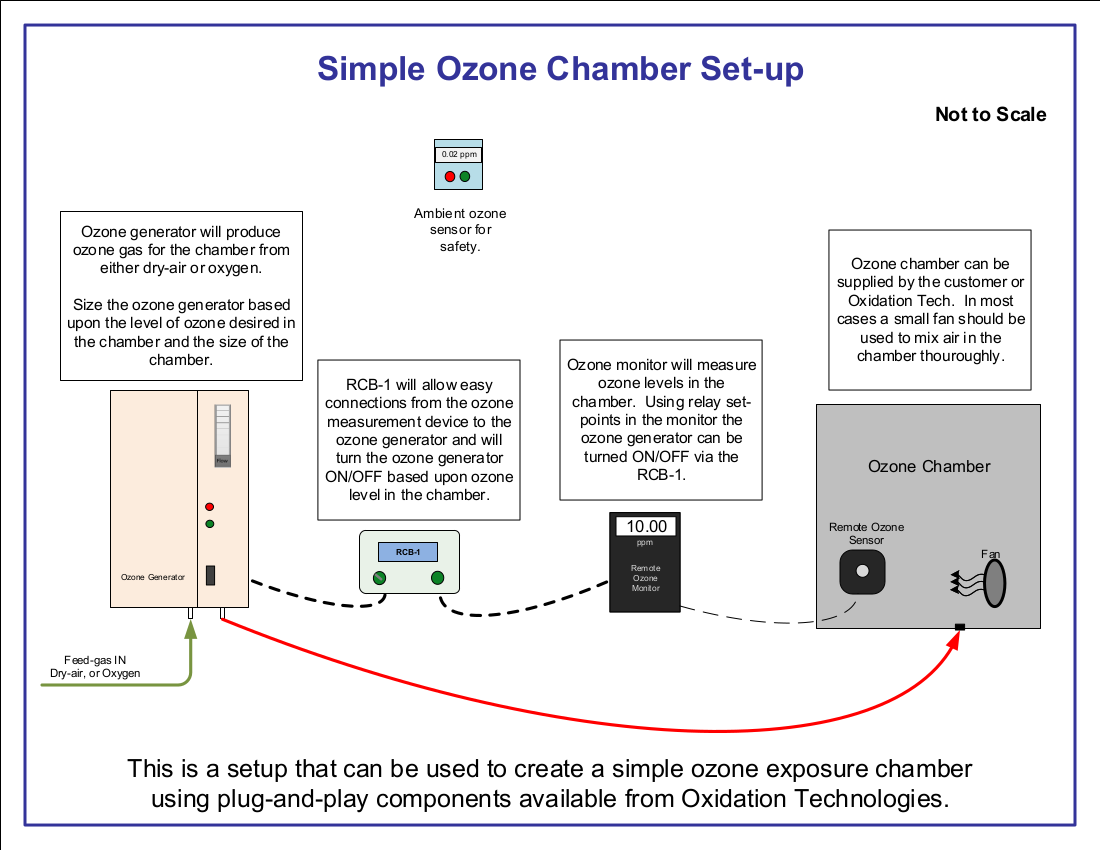
Looking at the diagrams below, 'DIAGRAM 1' shows the set-up for a custom ozone chamber when you are using one of the bench mount ozone analyzers, and then 'DIAGRAM 2' is showing the same basic scheme, but with a remote ozone sensor. However, the basic procedures are going to be the same, independent of which monitor set-up you decide to go with.
Following the diagrams below, we can see the procedures that will occur when your custom ozone chamber is working properly. First, using dry-air or oxygen as the feed-gas, your ozone generator will begin producing ozone for the chamber. Then, the ozone analyzer (or remote sensor) will read how much, in PPM, ozone is present in the chamber. The reading from the ozone analyzer will then be transferred to the RCB-1 relay control. Based on the reading given to the RCB-1, it will transfer a signal to the ozone generator to either continue producing ozone for the chamber, or to stop the ozone production.

Contact Us
For help creating your custom ozone chamber, please contact us here!